No Man’s Sky is a new computer game with a universe of 18 quintillion planets
The newly released No Man’s Sky computer game would actually take a gamer 584 billion years to finish according to its developers.
No Man’s Sky took five years in the making by indie developer Hello Games. No Man’s Sky is a glorified version of the highly popular Minecraft game. Built on an in-house engine, the final product weighs in at a meagre 5GB on your hard drive. More surprising is that the game of this magnitude was developed by just 15 persons. The game relying heavily on procedural generation, very little of the game’s visual make-up uses pre-made textures or assets. Instead, the star of the show is the set of algorithms at its core – lines of code capable of generating terrain, plants and even unique wildlife on-the-fly.
Each detail is unique to countless millions of planets across a virtual galaxy. No Man’s Sky’s 15 member British developers made this possible through a smart use of technology. Visually, we’re talking about a largely overlooked approach to graphics rendering that makes this level of variety possible. For No Man’s Sky, we’re talking about voxels.
Rather than concentrating solely on the polygons seen in 99 per cent of games made today, No Man’s Sky’s core utilisation of voxels makes this procedural generation – and also destruction – much easier.
What is VPN (Virtual Private Network)? How it Works?
Short Bytes: VPN is a technology used to setup a private network over the internet to share the resources of a corporate intranet with remote users and other office locations of the company.
Virtual Private Network or simply VPN is a personal network created over the internet, so that the devices connected over it can have an uninterrupted communication, regardless of any physical or digital barriers in the mid-way.
How it works?
The working of VPN is not a tough deal to understand, though it is. But, before that, you need to get an idea about the protocols or set of rules in laymen terms, used by VPN in providing a secure personal network. Let’s tell you more about it:
SSL (Secured Socket Layer): It uses a 3-way handshake method for assuring proper authentication between the client and server machines. The authentication process is based on cryptography where certificates behaving as cryptographic keys already stored in the client and server, are used for initiating the connection.
IPSec (IP Security): This protocol can work on transport mode or tunnelling mode, so that it can do its job of securing the VPN connection. The difference between the two is, transport mode only encrypts the Payload in the data i.e. only the message present in the data, whereas tunnelling mode encrypts the whole data to be transmitted.
PPTP (Point-To-Point Transfer Protocol): It connects a user located at some remote location to a private server in a VPN network, and also uses the tunnelling mode for its operations. Its low maintenance and simple working makes it the most widely adopted VPN protocol, further credit goes to the inbuilt support provided by Microsoft Windows.
L2TP (Layer Two Tunnelling Protocol): It facilitates the tunnelling of data between two geographical sites over the VPN network, often used in combination with the IPSec protocol which further aids to the security layer of the communication.
So, you have a rough idea about the various protocols used in a VPN. We shall proceed further and see how it works. When you are connected to a public network such as internet, you can assume that all your data is flowing through a big tunnel along with the data of other users.
So, anyone who wants to spy on you, can easily sniff your data packets from the network. When VPN comes into the scene, it actually provides you a personal tunnel inside that big tunnel. And all your data is transformed into garbage values, so no one can recognize it.
Setting up a VPN Connection involves Three Phases:
Authentication: In this phase, data packets are first encapsulated, basically wrapped inside another packet and some headers and other stuff are attached, all done to conceal the identity of the data packets. Now, your device initiates the connection by sending a Hello request to the VPN server, which replies with an acknowledgement and asks for the user credentials to clarify the authenticity of the user.
Tunnelling: After the authentication phase is finished, what we say, an imaginary tunnel is created which provides a direct point to point connection through the internet. We can send whatever data we want to via that tunnel.
Encryption: After we’ve successfully created the tunnel, we can send whatever information we want to, but that information is still not safe if we are connected to a free VPN service, which is also used by other people. So, we encrypt the data packets before sending them over the tunnel, thus barring any other user to peep into our packets, as he will only see some unrecognisable rubbish data flowing through the tunnel.
Say, you want to access a website, your device will send the access request to the VPN server which will then forward the request to the website in its name and receive the data from it. This data will then be transferred back to your device. And the website will think, the VPN server is the user and will find no trace of your device as the actual user.
Uses of VPN:
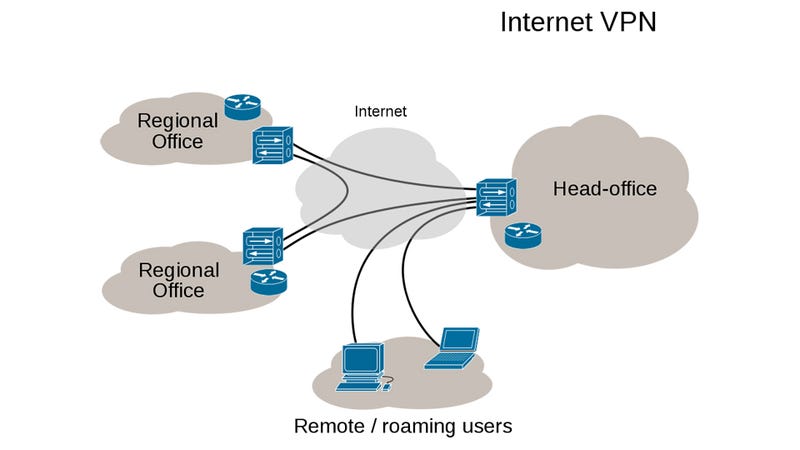
Remote User Access: A VPN connection is used to provide direct access of a corporate network to a user who is not in the geographical coverage of the corporate network. Logically, the remote user is connected just like a normal user who is using the network within the corporate premises.
Site to Site: VPN is also used to provide a homogenous network environment to a corporate firm having its office locations in different parts of the world. Thus, creating an uninterrupted sharing of resources bypassing the geographical hurdles.
Other uses include, accessing those services on the internet which are not available in a particular country or region, accessing censored content or if a user simply wants to remain anonymous on the internet.
Pros and Cons:
The biggest advantage of using a VPN is the cost effectiveness it facilitates in providing a single private network in comparison to using separate leased lines which can burn the pockets of corporate firms. All credited goes to the internet, for acting as the medium for uninterrupted VPN connections.
Apart from all the good things VPN does for us, it has its weak sides too. Not having a streamlined procedure for ensuring Quality of Service (QoS) over the internet, is the biggest incapacity VPN technology has in its possession. Furthermore, the level of security and authenticity outside the private network is beyond the purview of VPN technology. The incompatibility between different vendors only adds to its bunch of drawbacks.
Popular VPN services:
HideMyAss, PureVPN, VyprVPN, all these are well known the QoS and security they provide in their VPN connections.
Cyber Ghost, Surf Easy, Tunnel Bear are some free VPN services you can use if you don’t want to shell out your pocket. But you’ll have to satisfy yourself with less features, download limits, or advertisements. Also, these free services can’t beat the paid services, note that.
VPN on Android:
You can also setup a VPN connection on your smartphones running on Android OS. This allows you to access your company’s private network right on your Android Devices. VPN also facilitates the network administrator to control your device, add or delete data and track your usage.
Winding Up:
VPN has so far equipped us with an extraordinary level of security and anonymity we can accomplish while sharing our confidential data over the internet. Corporate giants have always admired the ease and uniformity they can engineer in their network while using VPN. Though, it has its limitations, but so far it has outperformed our expectations and should be praised for the cost effectiveness it provides in its operations.
Have a look at this video about VPN:
Writing is a good habit, if you use your creative mind and write some good stuff, it would make you sound more intelligent among your friends. So, don’t wait, just use your keyboard and type your imagination in the comments section below.
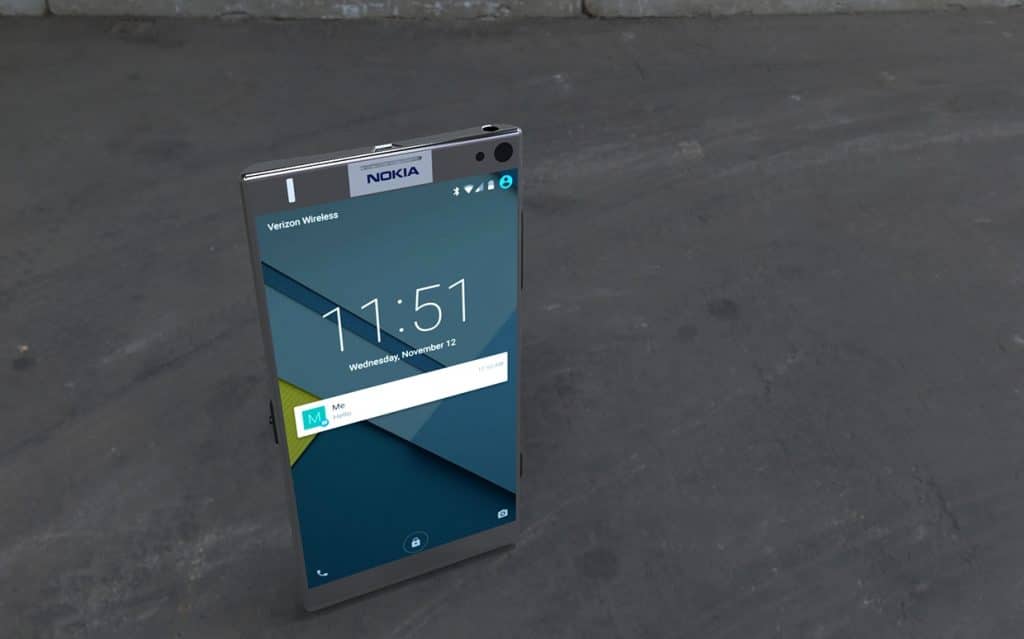
According to recent reports, Nokia is returning to the smartphone market. Microsoft recently announced it’s offloading of Nokia’s old feature phone business to a Foxconn subsidiary and a Finnish company called HMD Global.
It has been revealed by Nokia that HMD is also acquiring the rights to use the Nokia name on smartphones and tablets for the next ten years. This means the day is not far when we will see Nokia branded smartphones and tablets run on Android.
According to a statement from HMD, it plans to invest $500 million over the next three years to develop and promote products.The money will supposedly come from investors and from profits from the newly-acquired feature phone business. Though it has been made clear that Nokia’s involvement in the new devices will be very limited, it will be a part of HMD’s board and will set mandatory brand requirements and performance-related provisions.
HMD will be managed by an experienced group of mobile industry leaders. Arto Nummela, who previously held senior positions with Nokia and is currently the head of Microsoft’s Mobile Devices business for Greater Asia, Middle East and Africa as well as Microsoft’s global Feature Phones business, will serve as CEO on a closing of the Microsoft transaction.
HMD’s President on closing will be Florian Seiche, currently Senior Vice President for Europe Sales and Marketing at Microsoft Mobile, who previously held leadership roles at Nokia, HTC and other global brands.
Nokia is doing this to ensure that quality handsets are released because it is the goodwill of Nokia that will be at stake if the devices are inferior. FIH Mobile, the Foxconn subsidiary will be the manufacturer of the new HMD smartphones and tablets.
The agreement includes HMD’s access to Nokia’s vast arsenal of mobile patents. As to when will we get to see the Nokia handsets and tablets and with what version of Android, that is still under wraps.
How to Hide Any Drive in Windows Using Command Prompt?
Short Bytes: Using command prompt in Windows, you can easily hide/unhide any drive just like we hide folders and files. Windows labels each volume with a letter in its internal system and if we manipulate the letters assigned to a data volume, we can easily hide any drive on Windows.
On our personal computer or a laptop, we love to hide our personal data such as photos, videos etc. from the preying eyes of infiltrators. In those circumstances, we mostly prefer to hide a particular folder.
But this method is not new and people have become aware of this trick as well and they can now see the hidden folder easily under the menu option provided by the Windows.
In this case, how about hiding an entire drive in Windows which contains your personal data? Sounds cool? Yes, using some simple and handy commands, you can easily hide any drive in Windows using Command prompt. So, let’s see how it works:
Hide any drive in Windows using Command Prompt:
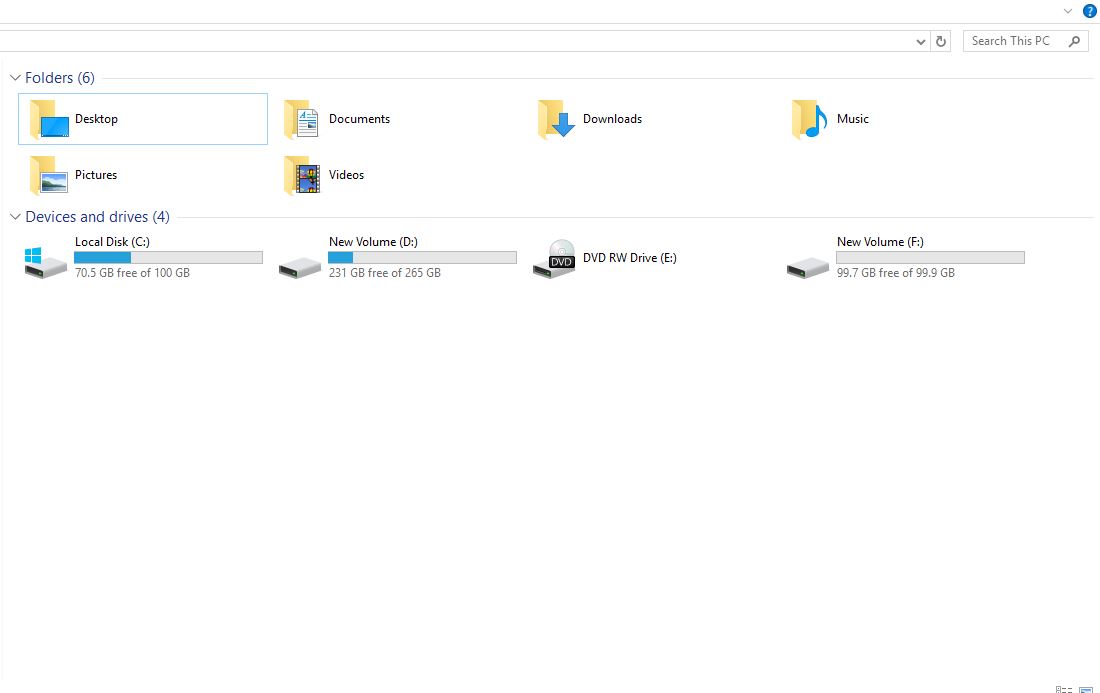
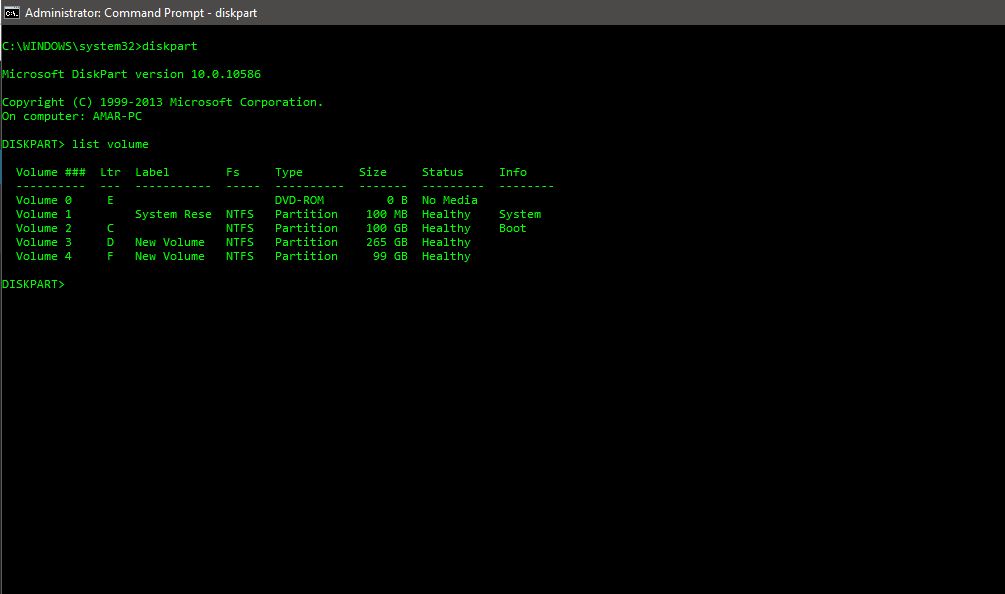
To hide any drive in Windows using CMD, follow the steps mentioned ahead. Here’s a snapshot of all of the drives on my Windows PC:
For this tutorial purpose and to be on the safer side, I have just created a new volume named ‘F’ and I am going to execute the following commands and see if it’s going to work out.
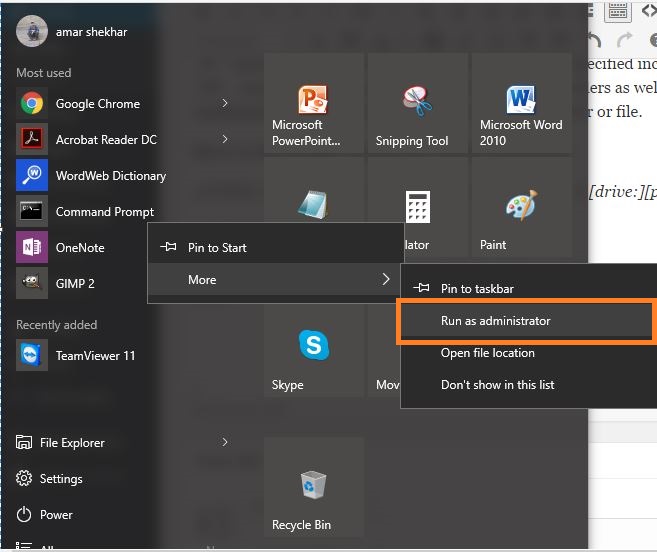
Open command prompt with ‘Run as administrator’ permissions.
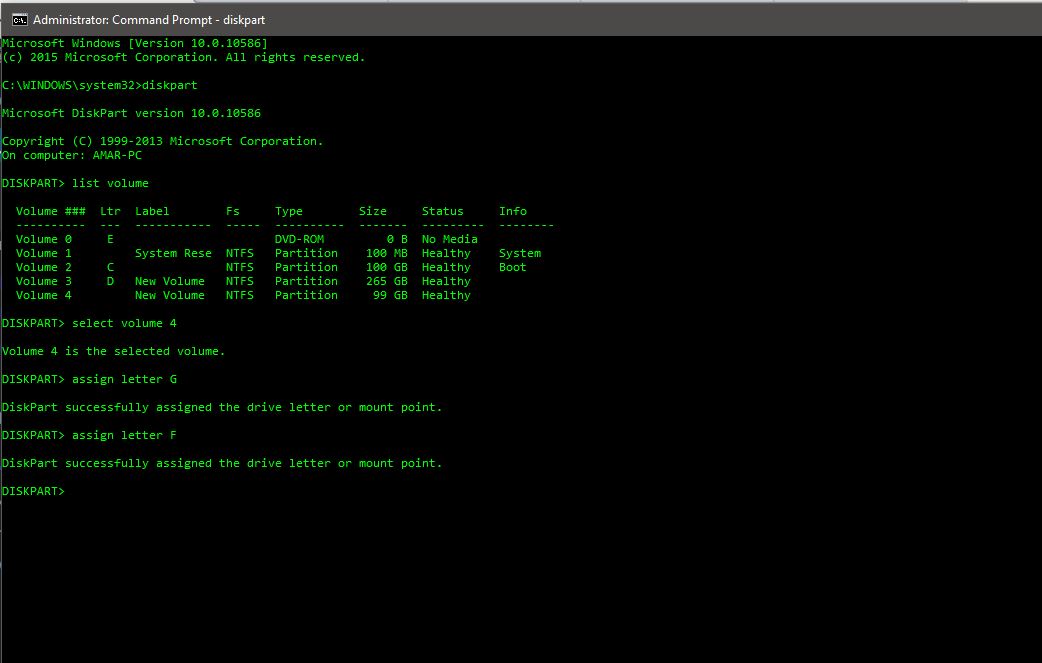
Type the command “Diskpart” in your command prompt. If any popup appears then, just press yes and it will open up a new window in your command prompt which will look something like this:
Then type list volume and you can see that all the volumes are listed down after your press enter. Looking closely, you can see that all the volumes have a volume number like 1, 2, 3, 4 etc. and each volume is assigned a letter such as C, D, E, F etc.
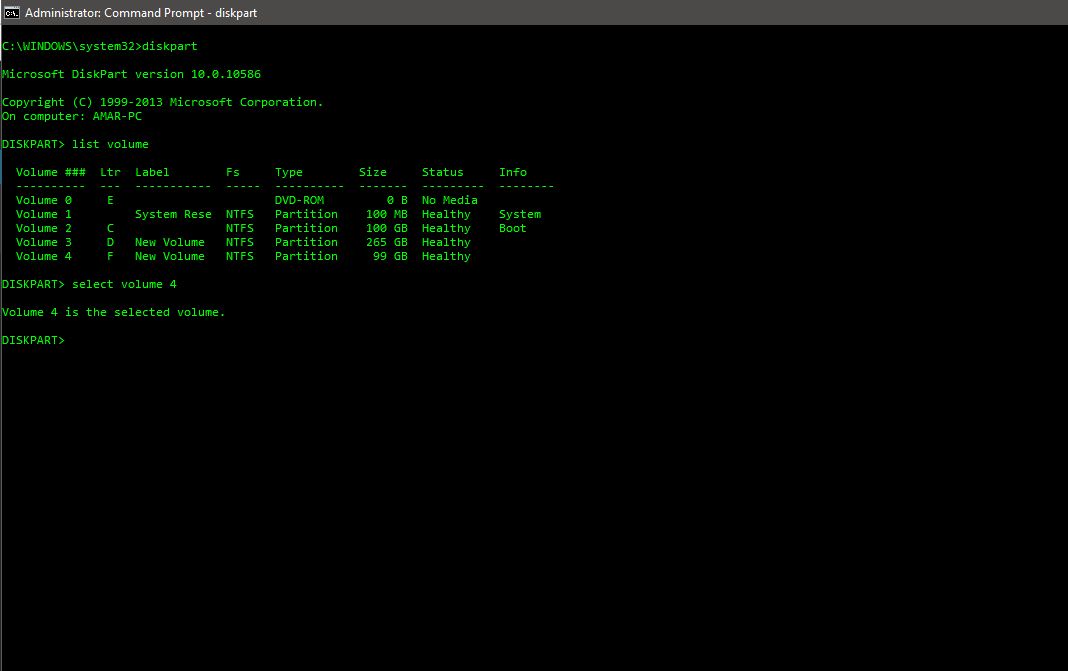
Now remember the volume number you want to hide. In my case, I want to hide my newly created volume assigned the letter F and it has volume number 4.
Now type select volume 4 and press enter. (Your volume number could be different than mine in this case). Once you’ve selected a volume, you will also get a message.
In the next step, we are going to hide the volume 4 or the volume you have selected in your case. In my case, for volume 4, the letter is ‘F’. In your case, the letter could be C, D, E, F etc.
So, recognize the associated letter with the drive and follow the last steps below:
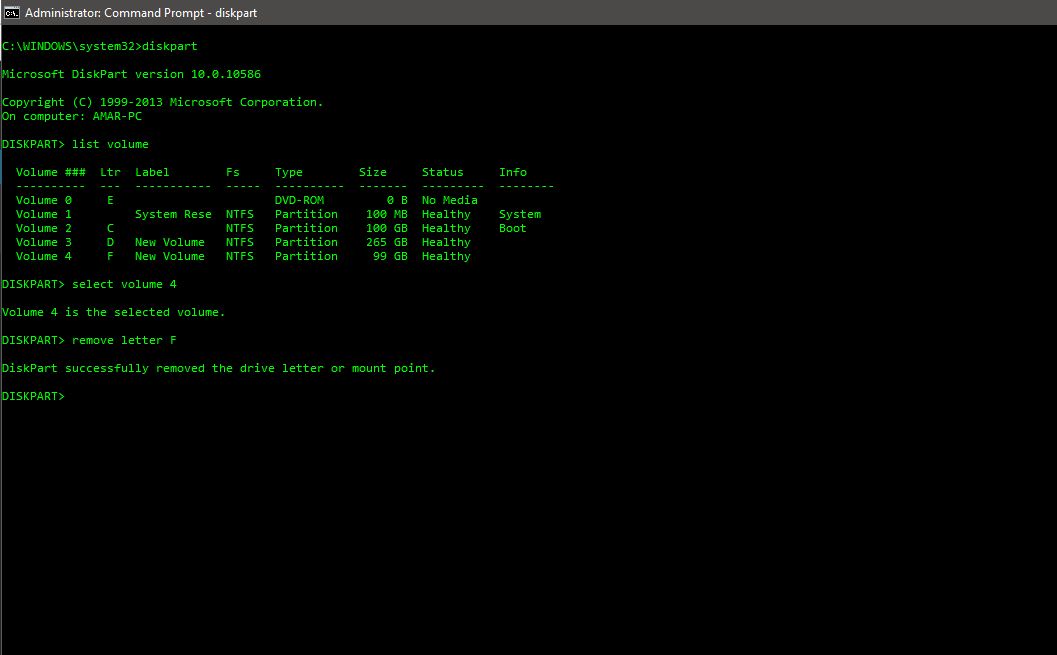
Type remove letter F in our command prompt.
And it’s done. The selected drive has been hidden successfully. Let me go and check it out. Oh, here is a screenshot of the same.
So, it works. Now, let’s unhide the same drive.
To unhide any drive in Windows using command prompt, follow the steps below:
Close your command prompt and follow the first four steps shown above (until select volume 4).
Now, type assign letter F (your drive letter in this case) and then press enter. Now your hidden drive is up and working in no time.
With these commands executed, you can simply hide any drive in Windows using Command prompt to protect your personal and sensitive data.
If you face any problem in executing these simple commands to hide any drive in Windows using Command prompt, you can let us know in the comments below.
How To Watch and Download YouTube Videos Offline On Your Smartphone
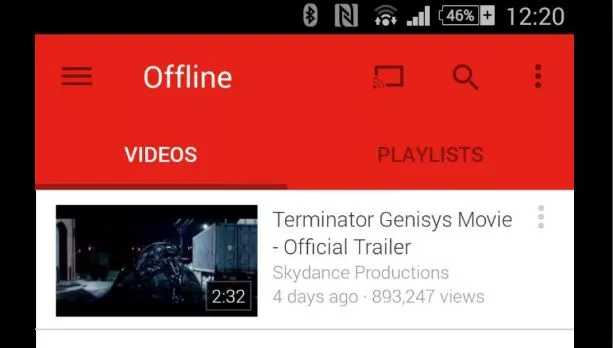
It’s time to get rid of those unreliable and annoying apps which you are using to watch and download YouTube video offline. Youtube released an update in its official app some days ago and now you can download YouTube videos on your Android or iOS Devices with YouTube official app.
“Once taken offline, videos can be played back without an Internet connection for 48 hours, allowing people to enjoy YouTube videos without worrying about slow connections. Starting today, much of the popular YouTube content in India is already available for people to view offline, including video content from some of India’s household names for entertainment and music, including T-Series, Saregama and Yashraj Films. Making these popular videos available for offline playback will help people move past the challenges of data connection, speed and cost to enjoy a smooth, buffer-free version of their favorite content.”
I am going to show you some very simple steps to download your YouTube videos. You can refer to the screenshots for more understanding.
There are few very easy steps to download your YouTube videos.
Steps:
Open the video you wish to download on the YouTube app on your smartphone.
You will find a download button (offline) on the right-hand side just below the video.
Now click the download button.
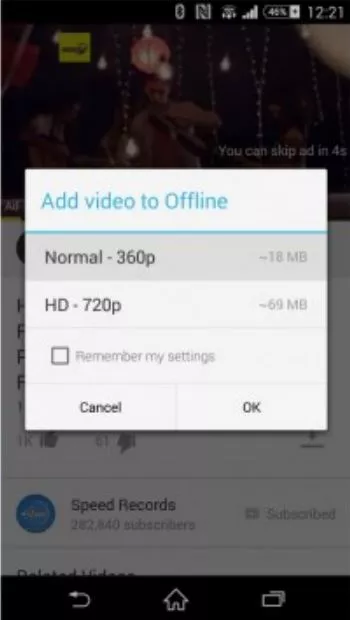
You will find a small popup asking about the resolution, now select the required resolution.
Now your video will start downloading itself.
It’s the official YouTube downloading app but it is having some limitations. They are:
You can not download all kind of videos.
Movies and music are not likely to be downloaded (official music videos of artists and subscription based paid content).
The videos can only be watched inside the YouTube app of your smartphone.
Apart from these there is no limitation on size and quantity of videos. You can download as much as you want from your Android or iOS phone. Also, there are no extra data charges. So if you have lots of free memory empty, you can start downloading videos without any worry.
Note: If the download button doesn’t show up in your smartphone app, update your Youtube app.
How to Enable Hidden Offline Browsing In Google Chrome
As Mozilla and Internet Explorer already offer a “Work Offline” option to save and read later, Google chrome also has a similar feature hidden inside to do the same.
In 2013, Randy Smith, Chrome networking engineer, implemented the support for an Offline Cache Mode in chrome. When you enable this feature, you’ll be able to navigate through the saved content in the cache.
How to Enable Hidden Offline Browsing In Google Chrome
Step 1:
Type chrome://flags/ in the search bar of Google Chrome.
Step 2:
Search for “Show Saved Copy Button” (It’ll be easier if you perform the search using CTRL+F ).
Step 3:
You’ll be seeing three options. Set it to “Enabled“, and restart the browser.
Step 4:
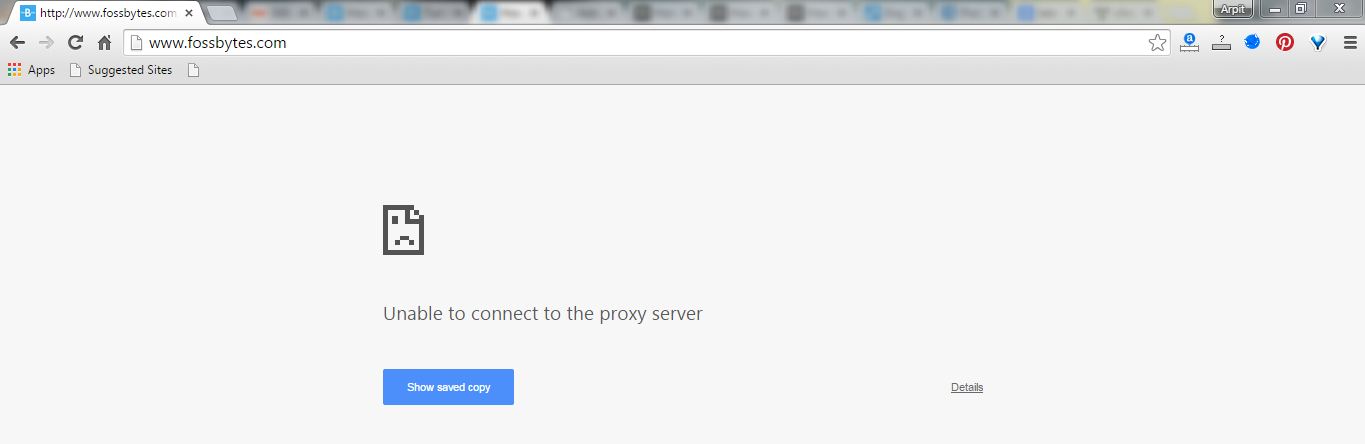
The next time you start the browser without an internet connection and enter some URL, it will ask you to “Show Saved copy” if the URL you entered is present in the local cache.
Click it and you are good to go. See the example below:
After loading the saved copy from cache, my website homepage looks like this:
Note:
The URL you entered must be stored in the local cache. If you want to access a particular page I’ll recommend you to copy and paste the URL in sticky notes or somewhere just before closing the browser.
Some of you may not find this feature working for the first time but it will surely run after a couple of restarts.
Did you find the offline working in Chrome useful? Tell us in comments.